
GitHub首页DIY:花里胡哨指数++

GitHub首页DIY:花里胡哨指数++
xxfer终于知道为什么网上关于GitHub Profile的详细教程那么少了,真的不好写。所以如果本篇文章对你有帮助,能在GitHub给个免费star吗?
话不多说,先上成果!
奉上源库地址和截图:
完整截图(建议点击图片放大看)

如果喜欢,欢迎 CV 昂哈哈哈,能给我一个star就更好了。其实我的主页搞得有点过于花哨了,没必要,大家各取所需即可。
开始花里胡哨
准备工作
其实GitHub首页DIY也很简单
- 只需要新建一个仓库名和自己 Github 用户名相同的仓库并且添加一个
README.md自述文件即可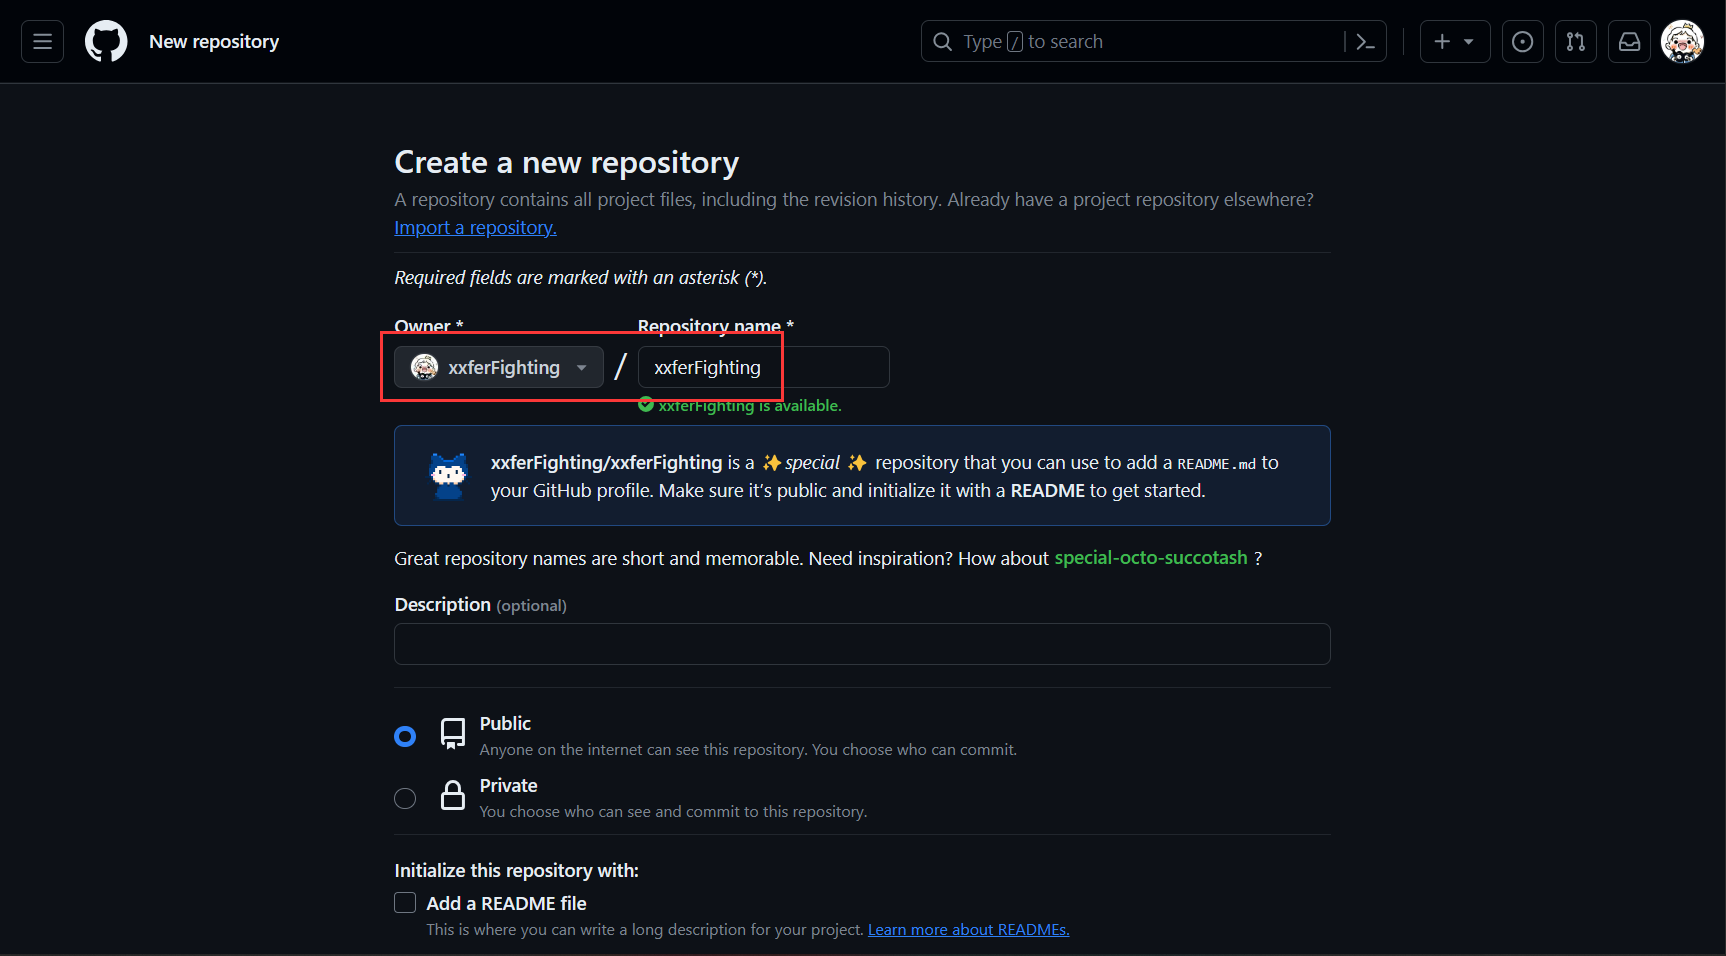
- GitHub默认为此文件添加了demo,我们编辑此文件,即可开启自己的DIY之路了!
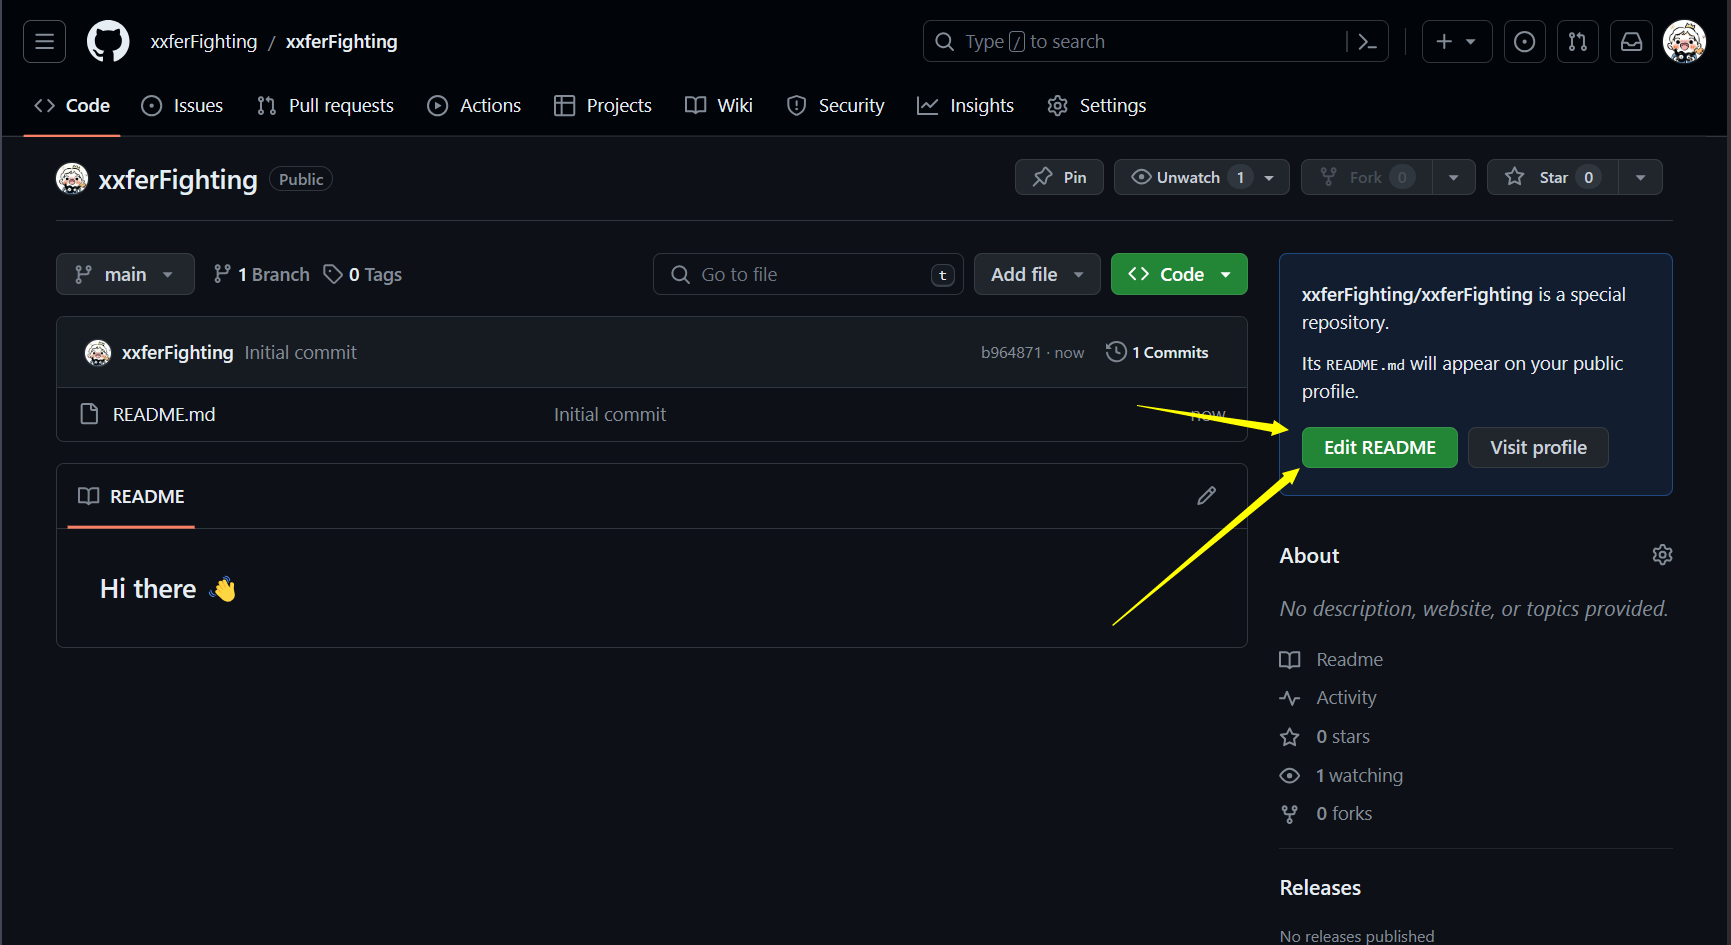
- 添加以后
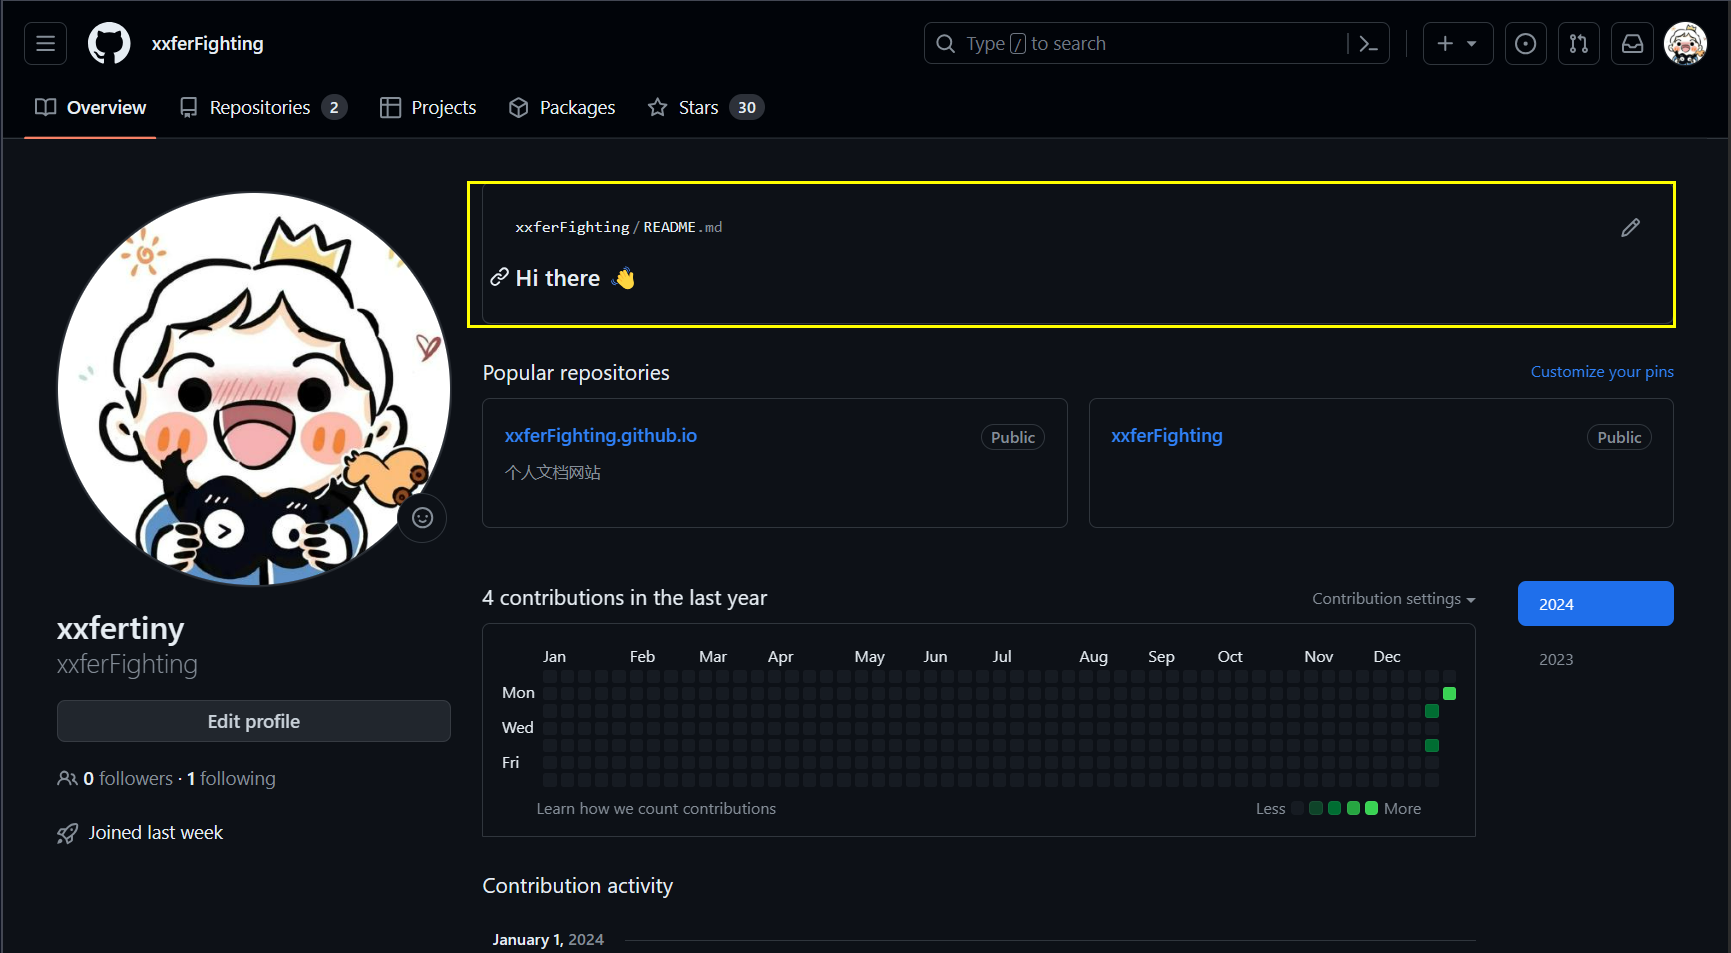
所以说,GitHub的首页DIY实际上就是对README.md文件进行DIY
无需配置Token即可使用
注意下面的例子使用的一般是我的username,大家更换成自己的即可
开头打字特效

emmmm…对,就是这样的循环打字特效,很炫酷 –> 源码传送门
可以使用官方给的Demo site,预览效果,然后直接复制代码即可。
例:
1 | <h1 align="center"> <a href="https://blog.xxfer.cn/"> <img src="https://readme-typing-svg.demolab.com?font=Fira+Code&pause=1000&width=435&lines=console.log(%22Hello%2C%20World%22);小李今天又在努力变强鸭~¢er=true&size=27"> </a> </h1> |
GitHub Stats Card
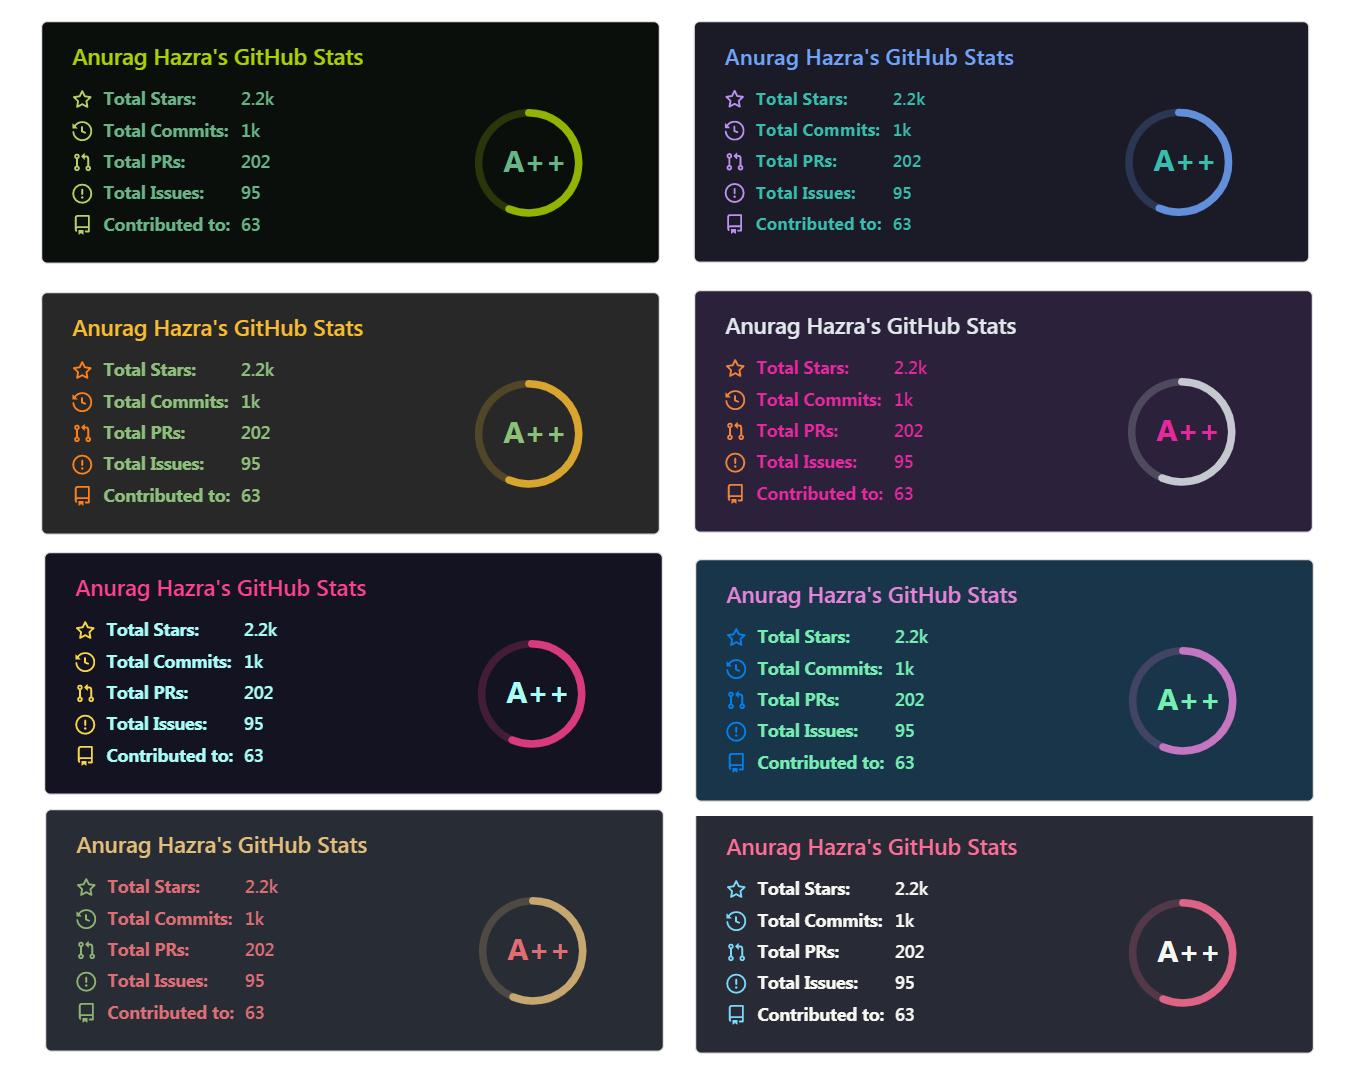
在README.md文件中获取动态生成的 GitHub 统计信息 –> 源码传送门
这里建议看官方的README介绍,并不难,觉得看英文累,用浏览器的翻译就行。
例:
1 | <img height="190px" width="100%" src="https://github-readme-stats.vercel.app/api?username=JJLibra&theme=radical&show_icons=true&count_private=true" /> |
Most used languages
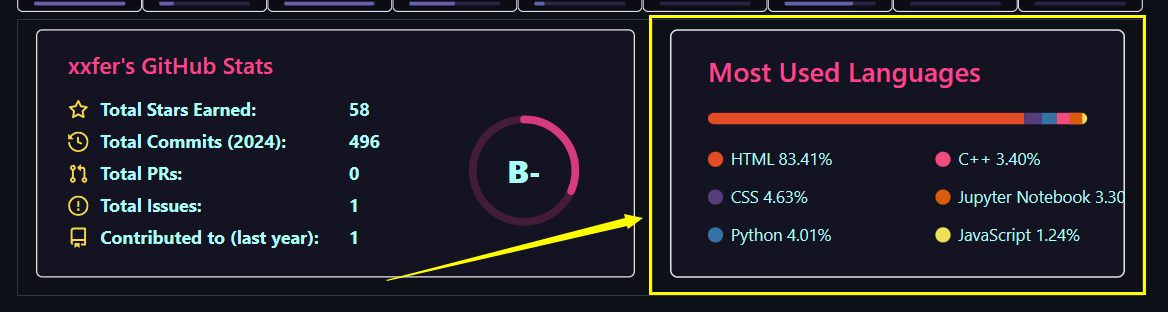
在README.md文件中添加使用编程语言对比统计图 –> 源码传送门
和上面的是同一个网址,还是建议直接看官方文档。
例:
1 | <img height="190px" width="100%" src="https://github-readme-stats-git-masterrstaa-rickstaa.vercel.app/api/top-langs/?username=JJLibra&theme=radical&show_icons=true&count_private=true&layout=compact" /> |
GitHub streak
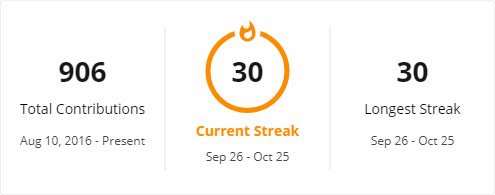
在README.md文件中展示连续提交代码的次数 –> 源码传送门
可以使用官方给的Demo site,预览效果,复制代码即可。
例:
1 | <img src="https://github-readme-streak-stats.herokuapp.com/?user=JJLibra&theme=default&hide_border=true" /> |
Github Profile Trophy

添加奖杯信息 –> 源码传送门
官方给出了很多主题配色,可以都试一下,喜欢哪一种就用哪一种。
例:
1 | <img alig src="https://github-profile-trophy.vercel.app/?username=JJLibra&theme=juicyfresh&column=9&rank=-U"/> |
GitHub Readme Activity Graph
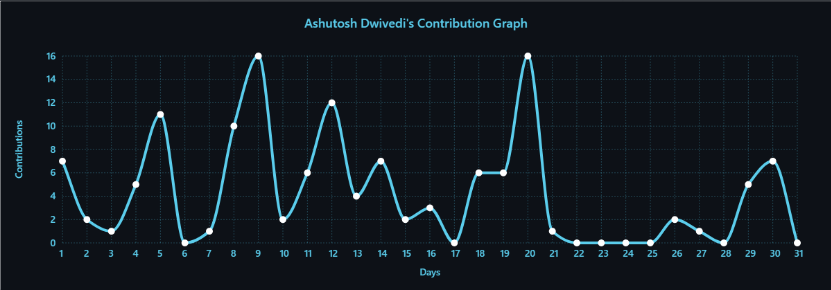
动态生成的活动图,用于显示过去 31 天的 GitHub 活动 –> 源码传送门
同样,可以选择主题配色和自定义元素颜色,详情参考官方文档。
例:
1 | <img src="https://github-readme-activity-graph.vercel.app/graph?username=JJLibra&custom_title=Xxfer's%20GitHub%20Activity%20Graph&bg_color=141321&color=A9FEF7&line=626069&point=F8D847&area_color=FE428E&title_color=FE428E&area=true" /> |
Spotify
我没有使用,因为不常用spotify
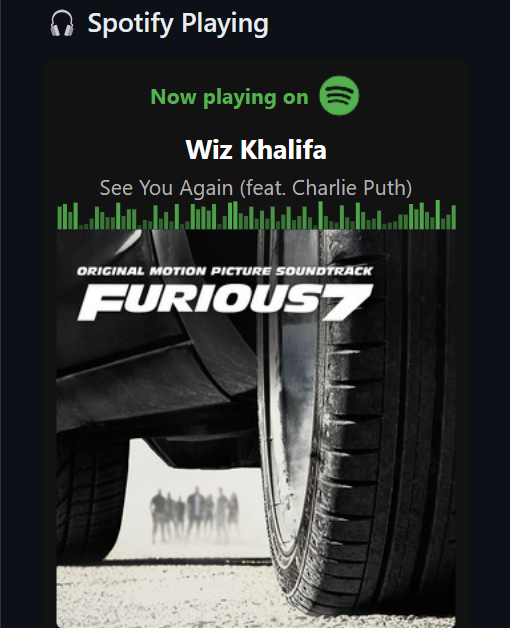
可以在 GitHub 首页中展示最近在 spotify 中听过的音乐 –> 源码传送门
例:
1 | <img src="https://spotify-github-profile.vercel.app/api/view?uid=31k53kp6hgkbovg72427dya5av44&cover_image=true&theme=default&show_offline=false&background_color=121212" /> |
Joke

可以在 GitHub 首页中展示一些关于 IT 行业的笑话 –> 源码传送门
例:
1 | <img src="https://readme-jokes.vercel.app/api?hideBorder&bgColor=%23121212" alt="Jokes Card" /> |
Quotes

可以在 GitHub 首页中随机展示一段名人名言 –> 源码传送门
例:
1 | <img src="https://quotes-github-readme.vercel.app/api?type=horizontal&theme=dark" /> |
Shields 徽章

为开源项目生成高质量小徽章图标,直接复制链接使用 –> 传送门
例:
HTML5
1 | <img src="https://img.shields.io/badge/-HTML5-E34F26?style=flat-square&logo=html5&logoColor=white" /> |
CSS3
1 | <img src="https://img.shields.io/badge/-CSS3-1572B6?style=flat-square&logo=css3" /> |
JS
1 | <img src="https://img.shields.io/badge/-JavaScript-oringe?style=flat-square&logo=javascript" /> |
相信聪明的同学对比一下就能领会使用方法,其实就是通过改变参数制作徽标。可以参考这篇文章
其中,logo参数和颜色都可以在这个网站搜索到,还支持下载svg和pgf,一并安利给大家。建议把style设为flat。
另外,制作徽标的网站不止Shields,推荐以下几个比较好用的:
Visitor Badge

这个徽章会实时改变,记录此页面被访问的次数 –> 传送门
修改一下username就能使用。
1 | <img src="https://komarev.com/ghpvc/?username=JJLibra&label=Views&color=0e75b6&style=flat" alt="访问量统计" /> |
社交统计
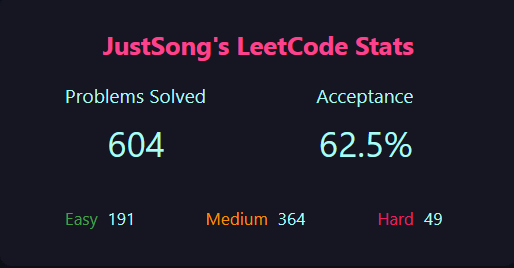
在README.md文件中展示你在一些流行的网站的数据 –> 传送门
目前API只支持一部分网站,不过可以把项目部署到自己的服务器,来监控自己服务器上部署的网站,具体参考官方文档。
1 | <img src="https://stats.justsong.cn/api/leetcode/?username=quanpeng&theme=dark"/> |
需要配置Token配合GitHub Actions才能使用
3D Contribution
在README.md文件中展示3D的贡献日历 –> 源码传送门
原理:利用GitHub Actions定时更新仓库中对应的svg,README文件中引用的svg也会跟着变化。
- 在项目根目录下创建
/.github/workflows/3D-contrib.yml文件,将以下代码复制到该文件中:1
2
3
4
5
6
7
8
9
10
11
12
13
14
15
16
17
18
19
20
21
22
23
24
25
26
27
28name: 3D Contrib
on:
schedule:
- cron: "0 21 * * *" #更新时间
workflow_dispatch:
permissions:
contents: write
pages: write
jobs:
build:
runs-on: ubuntu-latest
name: generate-github-profile-3d-contrib
steps:
- uses: actions/checkout@v2
- uses: yoshi389111/github-profile-3d-contrib@0.7.0
env:
GITHUB_TOKEN: ${{ secrets.GITHUB_TOKEN }}
USERNAME: ${{ github.repository_owner }}
- name: Commit & Push
run: |
git config user.name github-actions
git config user.email github-actions@github.com
git add -A .
git commit -m "generated"
git push - 不需要额外的Token,文件中的
GITHUB_TOKEN是工作流自动创建的令牌。 - 创建完提交代码到仓库,并尝试运行,看看是否配置成功
- 进入Setting旁边的
Action
- 选择
3D Contrib,然后Run workflow。
- 在
README.md文件中引用1
<img src="https://cdn.jsdelivr.net/gh/JJLibra/JJLibra/profile-3d-contrib/profile-night-rainbow.svg" />
Snake Contribution

在README.md文件中展示贪吃蛇贡献日历 –> 源码传送门
原理:利用GitHub Actions定时更新仓库中对应的svg,README文件中引用的svg也会跟着变化。
- 在项目根目录下创建
/.github/workflows/Snake-contrib.yml文件,将以下代码复制到该文件中:1
2
3
4
5
6
7
8
9
10
11
12
13
14
15
16
17
18
19
20
21
22
23
24
25
26
27
28
29
30
31name: Snake Contrib
on:
schedule:
- cron: "0 20 * * *"
workflow_dispatch:
jobs:
generate:
runs-on: ubuntu-latest
environment:
name: GH_TOKEN
timeout-minutes: 10
steps:
- name: generate github-contribution-grid-snake.svg
uses: aelassas/snk/svg-only@main
with:
github_user_name: ${{ github.repository_owner }}
outputs: |
dist/profile-snake-contrib/github-contribution-grid-snake.svg
dist/profile-snake-contrib/github-contribution-grid-snake-dark.svg?palette=github-dark
- name: push github-contribution-grid-snake.svg to the output branch
uses: crazy-max/ghaction-github-pages@v3.1.0
with:
target_branch: main
build_dir: dist
keep_history: true
env:
GITHUB_TOKEN: ${{ secrets.GH_TOKEN }} - 我采用的是environment里的secret,可能和其他教程不太一样,不过是可行的
生成一个Token令牌
- 右上角头像,进入setting
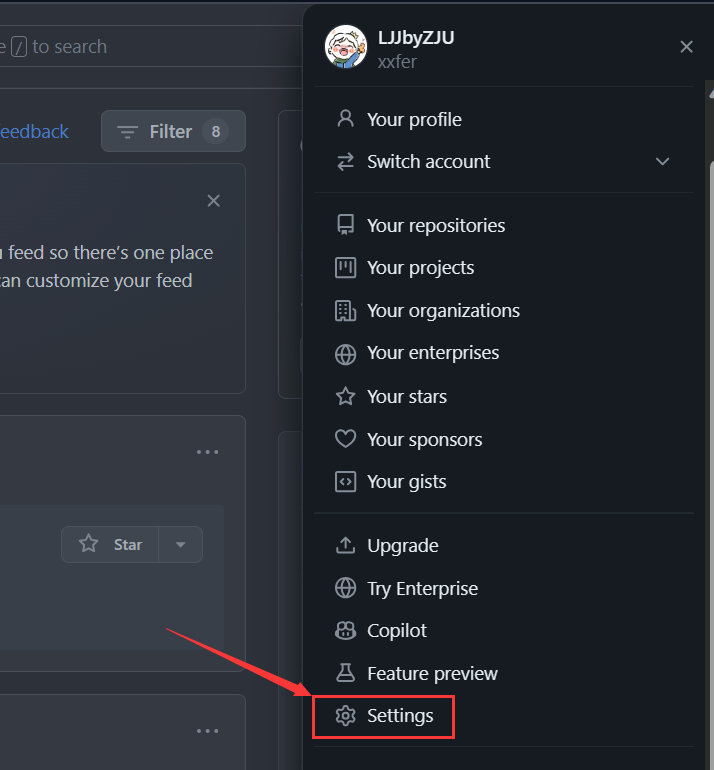
- 进入左侧栏底部的Deployer settings

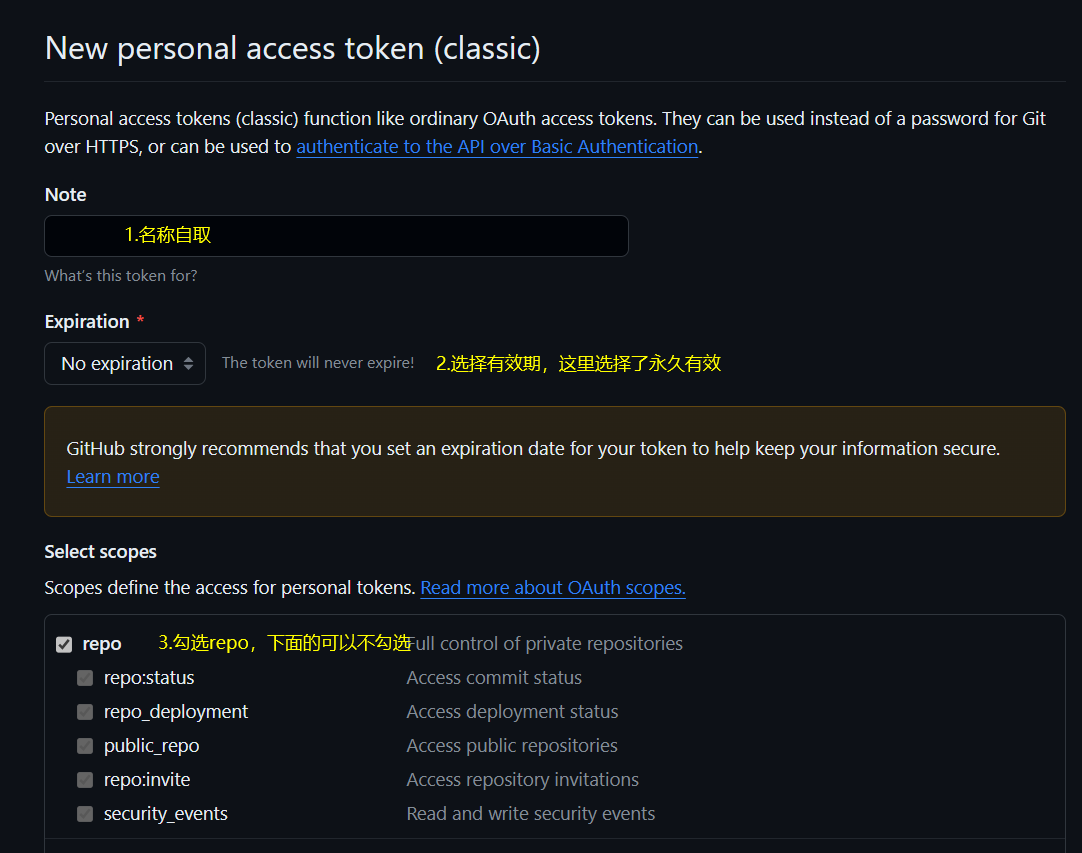
- 新建Token

- 选择参数后点击下面的创建,然后会生成一串字符,就是你的Token,只会出现一次,建议暂时不要关闭这个页面注意上图的第三步建议前三个都勾选,如果不清楚含义,可以全部勾选
将Token添加到Environment secrets
- 进入仓库的
Setting - 打开
Action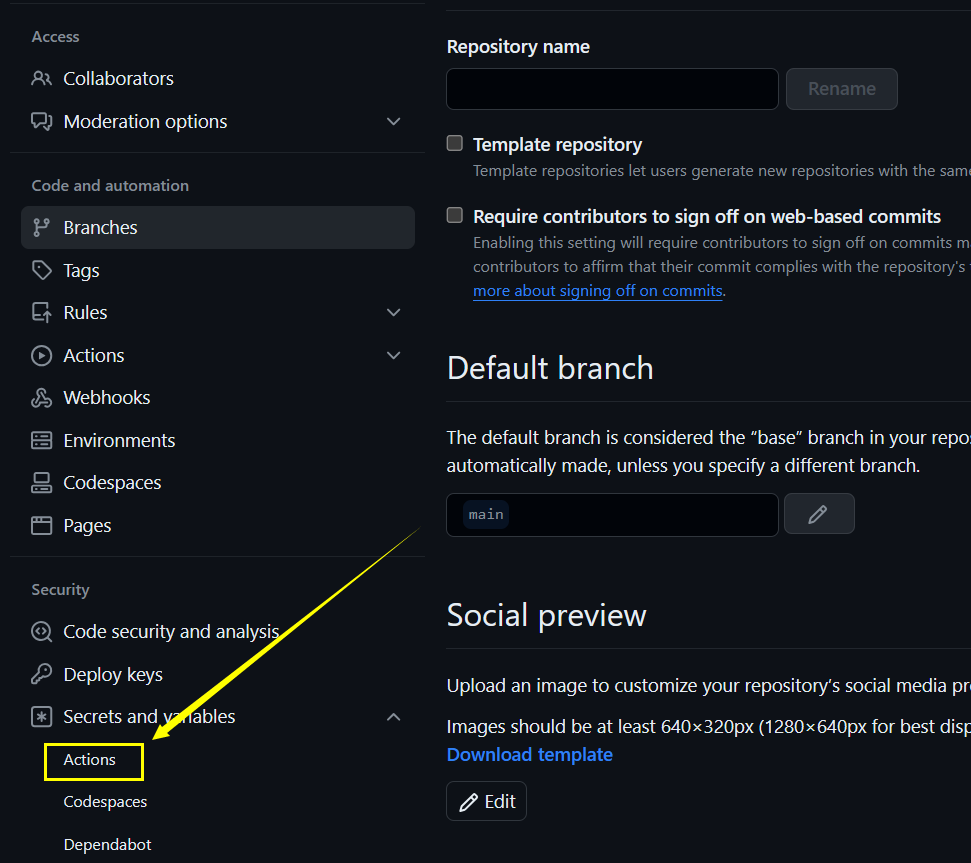
- 把刚才生成的
Token添加到Environment secrets,注意Secret的名字要和上面的yml文件中的name一致,为GH_TOKEN,否则会报错。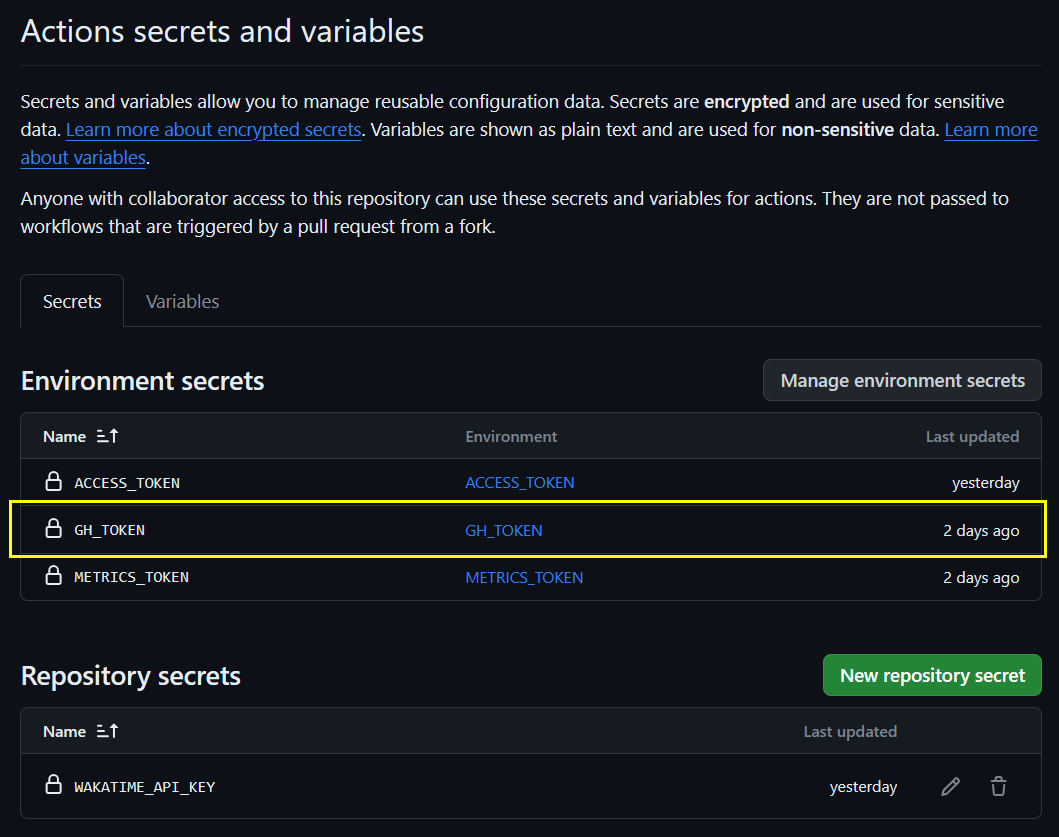
- 创建完提交代码到仓库,并尝试运行,看看是否配置成功。如果报错了,多半是因为
Secret没有配置正确,检查一下。也可以在评论区交流。
可能遇到的问题:
- 设置的
Environment secrets的name与yml文件中的environment name不一致,重新设置一下,最后的样子就是下面框框内 - 运行成功以后可能git提交会报错,是因为Action生成了新的svg文件,导致远程仓库与本地内容不一致,使用下面代码应该可以解决
1
2
3
4
5
git add .
git commit -m "update"
git fetch
git merge origin FETCH_HEAD
git push - 权限问题:本篇博客中的部分GitHub Actions需要修改(读+写)权限
解决方法:点击仓库的setting–>Actions–>General–>勾选Read and write permissions–>Save
- 在
README.md文件中引用,这里只是一个例子,大家举一反三玩出新花样。1
<img alt="github-snake" src="https://cdn.jsdelivr.net/gh/JJLibra/JJLibra/profile-snake-contrib/github-contribution-grid-snake-dark.svg" />
Fork&Star

在仓库介绍显示fork数和star数
- 在项目根目录下创建
/.github/workflows/fork&star.yml文件,将以下代码复制到该文件中:1
2
3
4
5
6
7
8
9
10
11
12
13
14
15
16
17
18
19
20
21
22name: Update Fork Star
on:
fork:
watch:
types:
- started
schedule:
- cron: '0 0 * * *'
workflow_dispatch:
jobs:
update:
runs-on: ubuntu-latest
environment:
name: ACCESS_TOKEN
steps:
- name: This repo has x stars y forks
uses: ouuan/This-repo-has-x-stars-y-forks-action@v2
with:
token: ${{ secrets.ACCESS_TOKEN }}
template: "Xxfer's profile with <starCount> stars and <forkCount> forks 🎉" - 按照上文的方法再生成一个新的Token
- 按上文步骤在仓库的Setting->Secrets->Actions->Environment secrets中添加
ACCESS_TOKEN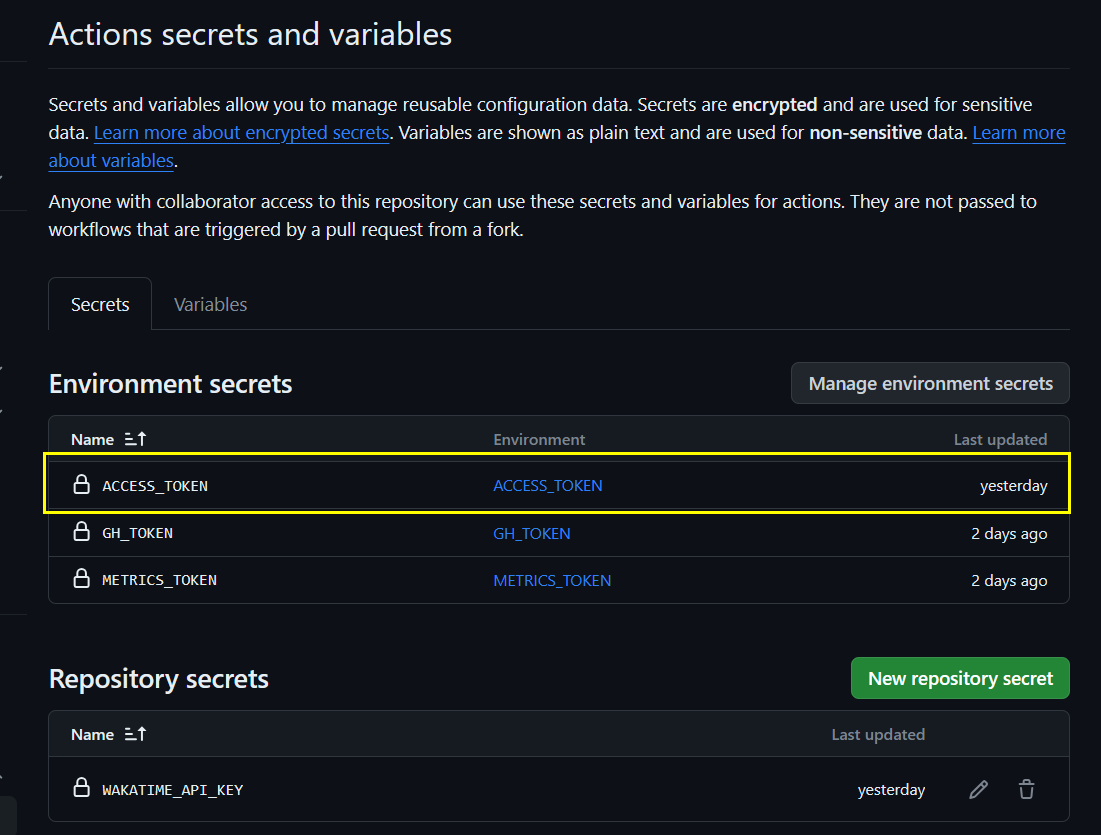
- 创建完提交代码到仓库,并尝试运行,看看是否配置成功。
- 这个不显示在
README.md文件中,不需要引用。
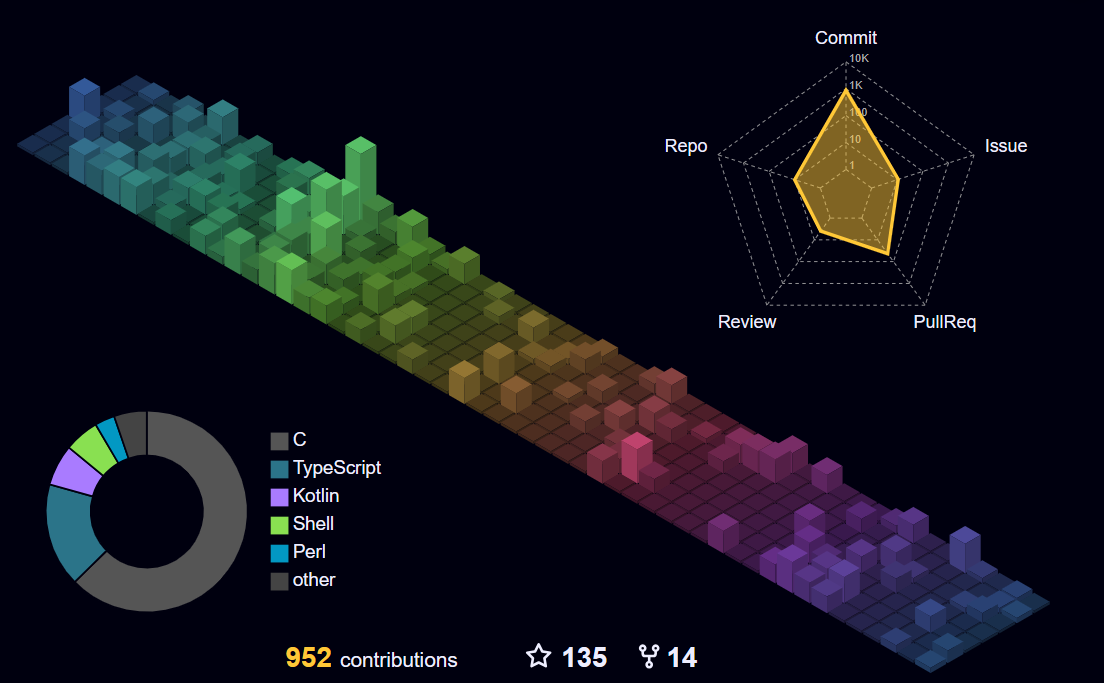
Metrics
生成的东西有点多,建议看我的源码github-metrics文件夹,里面有很多的svg文件。
在 GitHub首页展示比较具体的使用信息 –> 源码传送门
Demo site
原理:利用GitHub Actions定时更新仓库中对应的svg,README文件中引用的svg也会跟着变化。
- 在项目根目录下创建
/.github/workflows/metrics.yml文件,将以下代码复制到该文件中:1
2
3
4
5
6
7
8
9
10
11
12
13
14
15
16
17
18
19
20
21
22
23
24
25
26
27
28
29
30
31
32
33
34
35
36
37
38
39
40
41
42
43
44
45
46
47
48
49
50
51
52
53
54
55
56
57
58
59
60
61
62
63
64
65
66
67
68
69
70
71
72
73
74
75
76
77
78
79
80
81
82
83
84
85
86
87
88
89
90
91
92
93
94
95
96
97
98
99
100
101
102
103
104
105
106
107
108
109
110
111
112
113
114
115
116
117
118
119
120
121
122
123
124
125
126
127
128
129
130
131
132
133
134
135
136
137
138
139
140
141
142
143
144
145
146
147
148
149
150
151
152
153
154
155
156
157
158
159
160
161
162
163
164
165
166
167
168
169
170
171
172
173
174
175
176
177
178
179
180
181
182
183
184
185
186
187
188
189
190
191name: Metrics
on:
schedule:
- cron: "0 0 * * *"
workflow_dispatch:
# push: {branches: ["master", "main"]}
jobs:
github-metrics:
runs-on: ubuntu-latest
environment:
name: METRICS_TOKEN
permissions:
contents: write
steps:
# 基础信息(顺带了几个小插件)
- name: base
uses: lowlighter/metrics@latest
with:
filename: github-metrics/base.svg
# Your GitHub token
token: ${{ secrets.METRICS_TOKEN }}
# Options
user: JJLibra
template: classic
config_timezone: Asia/Shanghai
base: "header, activity, community, repositories"
# 此插件为文档中的 🧮 Repositories traffic
plugin_traffic: yes
# 此插件为文档中的 👨💻 Lines of code changed
plugin_lines: yes
# 此插件为文档中的 🙋 Introduction
plugin_introduction: yes
# 此插件为文档中的 🎫 Gists
plugin_gists: yes
# 此插件为文档中的 💫 Star lists
plugin_starlists: yes
plugin_starlists_limit_repositories: 2
plugin_starlists_languages: yes
plugin_starlists_limit_languages: 8
plugin_starlists_only: Awesome
# 📅 Isometric commit calendar
- name: Full-year calendar
uses: lowlighter/metrics@latest
with:
filename: github-metrics/isocalendar.fullyear.svg
token: ${{ secrets.METRICS_TOKEN }}
# 不添加基础信息
base: ""
# 使用此插件
plugin_isocalendar: yes
# 设置成显示整年
plugin_isocalendar_duration: full-year
# 🈷️ Languages activity
- name: Indepth analysis
uses: lowlighter/metrics@latest
with:
filename: github-metrics/languages.indepth.svg
token: ${{ secrets.METRICS_TOKEN }}
base: ""
plugin_languages: yes
plugin_languages_ignored: >-
html, css, tex, less, dockerfile, makefile, qmake, lex, cmake, shell,
gnuplot
plugin_languages_indepth: yes
plugin_languages_details: lines, bytes-size
plugin_languages_limit: 4
plugin_languages_analysis_timeout: 15
# ✨ Stargazers
- name: Using chartist charts
uses: lowlighter/metrics@latest
with:
filename: github-metrics/stargazers.chartist.svg
token: ${{ secrets.METRICS_TOKEN }}
base: ""
plugin_stargazers: yes
plugin_stargazers_charts_type: chartist
# 🌟 Recently starred repositories
- name: Recently starred
uses: lowlighter/metrics@latest
with:
filename: github-metrics/stars.svg
token: ${{ secrets.METRICS_TOKEN }}
base: ""
plugin_stars: yes
plugin_stars_limit: 10
# 💡 Coding habits and activity
- name: Recent activity charts
uses: lowlighter/metrics@latest
with:
filename: github-metrics/habits.charts.svg
token: ${{ secrets.METRICS_TOKEN }}
base: ""
plugin_habits: yes
plugin_habits_facts: no
plugin_habits_charts: yes
config_timezone: Europe/Paris
# 🎟️ Follow-up of issues and pull requests
- name: Indepth analysis
uses: lowlighter/metrics@latest
with:
filename: github-metrics/followup.indepth.svg
token: ${{ secrets.METRICS_TOKEN }}
base: ""
plugin_followup: yes
plugin_followup_indepth: yes
# 🎭 Comment reactions
- name: Comment reactions
uses: lowlighter/metrics@latest
with:
filename: github-metrics/reactions.svg
token: ${{ secrets.METRICS_TOKEN }}
base: ""
plugin_reactions: yes
plugin_reactions_limit: 100
plugin_reactions_details: percentage
# 📓 Featured repositories
- name: Pinned repositories
uses: lowlighter/metrics@latest
with:
filename: github-metrics/repositories.pinned.svg
token: ${{ secrets.METRICS_TOKEN }}
base: ""
plugin_repositories: yes
plugin_repositories_pinned: 2
# 💬 Discussions
- name: GitHub Discussions
uses: lowlighter/metrics@latest
with:
filename: github-metrics/discussions.svg
token: ${{ secrets.METRICS_TOKEN }}
base: ""
plugin_discussions: yes
plugin_discussions_categories_limit: 8
# 📆 Commit calendar
- name: Full history calendar
uses: lowlighter/metrics@latest
with:
filename: github-metrics/calendar.full.svg
token: ${{ secrets.METRICS_TOKEN }}
base: ""
plugin_calendar: yes
plugin_calendar_limit: 0
# 🏆 Achievements
- name: Compact display
uses: lowlighter/metrics@latest
with:
filename: github-metrics/achievements.compact.svg
token: ${{ secrets.METRICS_TOKEN }}
base: ""
plugin_achievements: yes
plugin_achievements_only: >-
polyglot, stargazer, sponsor, deployer, member, maintainer, developer,
scripter, packager, explorer, infographile, manager
plugin_achievements_display: compact
plugin_achievements_threshold: X
# 📰 Recent activity
- name: Recent activity
uses: lowlighter/metrics@latest
with:
filename: github-metrics/activity.svg
token: ${{ secrets.METRICS_TOKEN }}
base: ""
plugin_activity: yes
plugin_activity_limit: 5
plugin_activity_days: 0
plugin_activity_filter: issue, pr, release, fork, review, ref/create
# 🗨️ Stack Overflow
- name: Top answers from stackoverflow
uses: lowlighter/metrics@latest
with:
filename: github-metrics/stackoverflow.svg
token: NOT_NEEDED
base: ""
plugin_stackoverflow: yes
plugin_stackoverflow_user: 1
plugin_stackoverflow_sections: answers-top
plugin_stackoverflow_limit: 2 - 按照上文的方法再生成一个新的Token
- 按上文步骤在仓库的Setting->Secrets->Actions->Environment secrets中添加
METRICS_TOKEN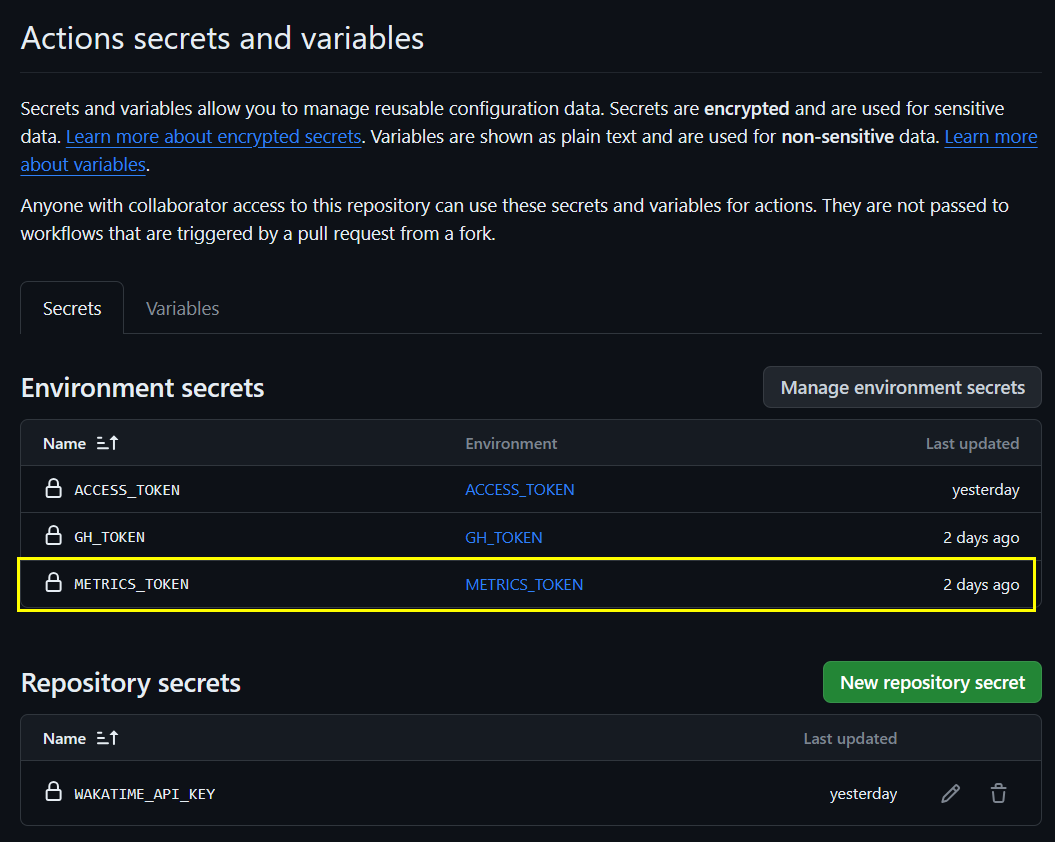
- 创建完提交代码到仓库,并尝试运行,看看是否配置成功。
- 在
README.md文件引用1
<img src="https://cdn.jsdelivr.net/gh/JJLibra/JJLibra/github-metrics/base.svg" />
Wakatime
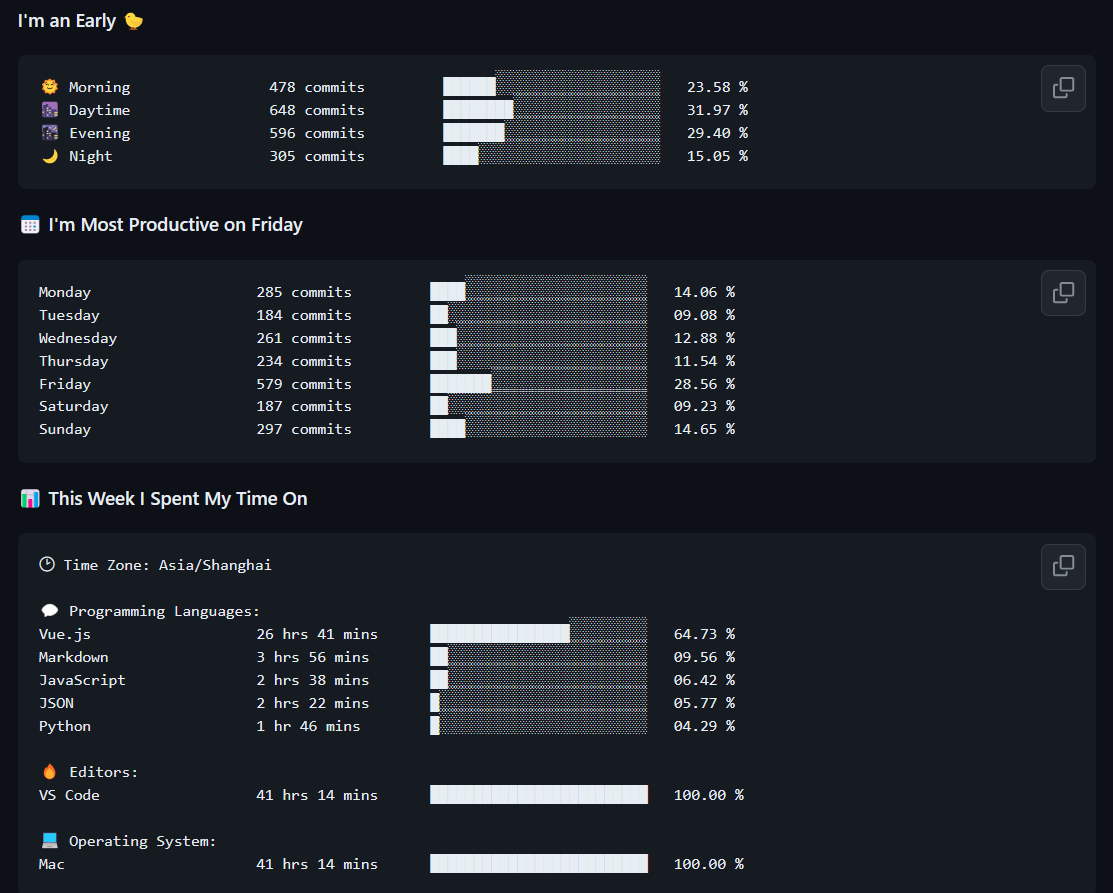
在GitHub首页展示日常编程情况 –> 官网传送门
先在官网注册账号,进入wakatime官网的Setting,里面的Secret API Key一会儿会用到。
- 在项目根目录下创建
/.github/workflows/waka.yml文件,将以下代码复制到该文件中:1
2
3
4
5
6
7
8
9
10
11
12
13
14
15
16
17
18
19
20
21
22
23
24
25
26
27name: Waka Readme
on:
schedule:
- cron: '30 18 * * *'
workflow_dispatch:
jobs:
update-readme:
name: Update Readme with Metrics
runs-on: ubuntu-latest
environment:
name: GH_TOKEN
permissions:
contents: write
steps:
- uses: anmol098/waka-readme-stats@master
with:
WAKATIME_API_KEY: ${{ secrets.WAKATIME_API_KEY }}
GH_TOKEN: ${{ secrets.GH_TOKEN }}
SHOW_LINES_OF_CODE : "False"
SHOW_PROFILE_VIEWS : "False"
SHOW_LANGUAGE_PER_REPO : "False"
SHOW_LOC_CHART : "False"
SHOW_SHORT_INFO : "False"
SHOW_PROJECTS : "False"
SHOW_TOTAL_CODE_TIME : "False" - 这里的
GH_TOKEN直接使用之前创建的,所以不需要再生成新的Token了 - 按上文步骤在仓库的Setting->Secrets->Actions->Repository secrets中添加
WAKATIME_API_KEY,值就是wakatime官网Setting里面的Secret API Key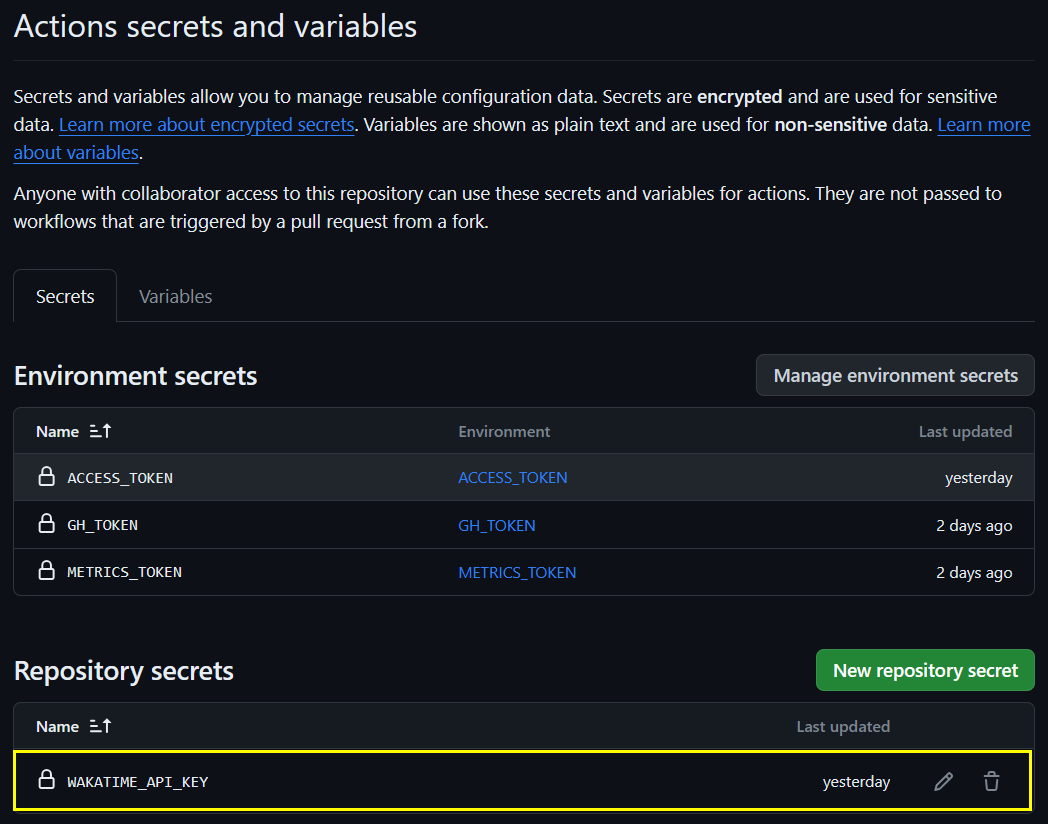
- 创建完提交代码到仓库,并尝试运行,看看是否配置成功。
- 在
README.md文件引用,这里的引用方式不太一样,在想要添加内容的地方插入下面代码,内容最终会添加到两个注释之间1
2
3<!--START_SECTION:waka-->
<!--END_SECTION:waka-->
Social Readme
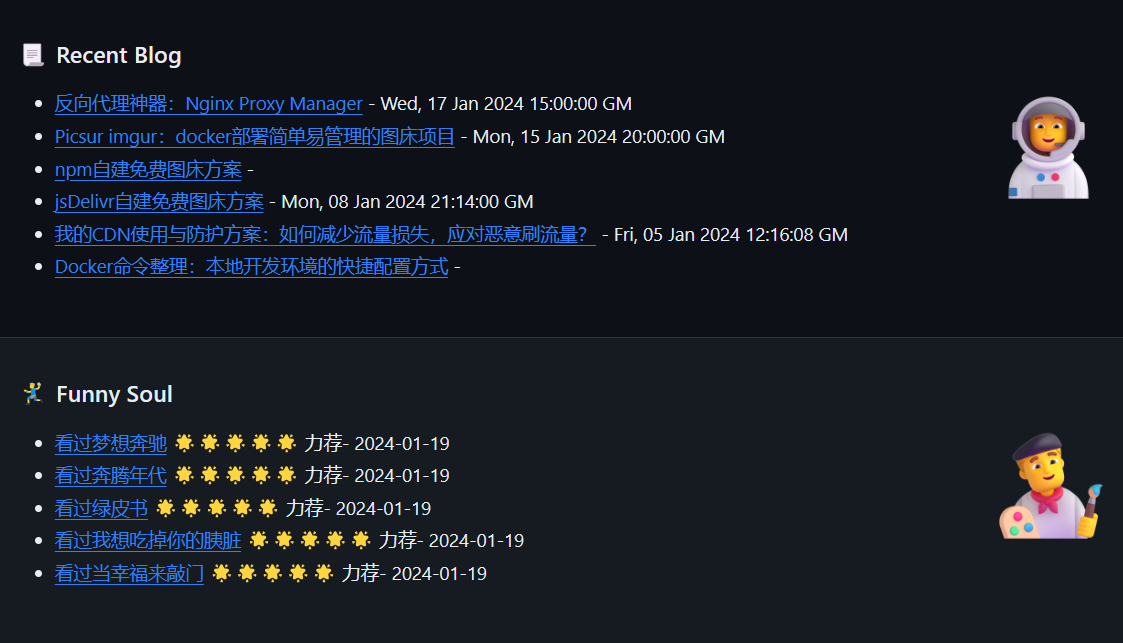
在GitHub首页展示博客等个人网站的最新动态信息 –> 源码传送门
- 在项目根目录下创建
/.github/workflows/social.yml文件,将以下代码复制到该文件中:1
2
3
4
5
6
7
8
9
10
11
12
13
14
15
16
17
18
19
20
21name: Social Readme
on:
schedule:
- cron: '0 16 * * *'
workflow_dispatch:
permissions:
contents: write # To write the generated contents to the readme
jobs:
update-readme:
runs-on: ubuntu-latest
steps:
- uses: zylele/social-readme@master
with:
blog_rss_link: https://blog.xxfer.cn/rss.xml
blog_limit: 6 # blog数量
douban_name: xxferyyds
douban_limit: 5 # 豆瓣最新动态数量
commit_message: Updated douban # commit说明 - 这一步不需要生成Token
- 需要提供网站的rss文件,比如上面是我的博客rss链接。豆瓣只需要提供username即可。
1
https://blog.xxfer.cn/rss.xml
- 在
README.md文件中引用,引用方式和wakatime类似1
2
3
4
5
6<!-- START_SECTION:blog -->
<!-- END_SECTION:blog -->
<!-- START_SECTION:douban -->
<!-- END_SECTION:douban --> - 创建完提交代码到仓库,并尝试运行,看看是否配置成功。
API的使用
由于DIY过程中有很多的API使用,这些需要用到Token和工作流,如果又不理解的同学可以参考利用Github_Token玩转仓库API和如何使用Github Actions提高独立开发效率?
案例仓库
- https://github.com/abhisheknaiidu/awesome-github-profile-readme
- https://github.com/eryajf/awesome-github-profile-readme-chinese